I still remember the moment I decided to build my first website. It was a rainy Saturday in 2024, and I was sipping coffee, dreaming about sharing my fishing stories online. The idea of a website felt daunting—coding, servers, design? I’m no tech wizard. But then I stumbled across a simple truth: in 2025, you don’t need to be a developer to create a professional website. With the right tools, I had my site up in under 30 minutes, and it looked better than I’d hoped.
If you’ve been putting off launching your blog, portfolio, or small business site, this guide is for you. I’ll walk you through exactly how I built my website, step by step, using Hostinger and WordPress. No jargon, no stress—just a laptop, a cup of coffee, and 30 minutes. Ready to turn your idea into reality? Let’s dive in!
Why You Don’t Need to Be a Tech Genius in 2025
Back in the day, building a website meant writing HTML from scratch or shelling out thousands for a developer. Today, platforms like WordPress and hosting providers like Hostinger make it as easy as setting up an email account. Whether you’re starting a fishing blog like I did, showcasing your photography, or selling handmade crafts, the process is the same:
- Pick a hosting plan to store your site.
- Install WordPress to manage content.
- Customize a theme to make it yours.
I’m not exaggerating when I say I did this in under 30 minutes—mistakes and all. My site, fishingword.com, went from a blank screen to a polished blog faster than I could finish my coffee. Let me show you how you can do it too.
Step 1: Choosing the Right Hosting (Keep It Simple)
When I started, the sheer number of hosting providers overwhelmed me. Bluehost, GoDaddy, SiteGround, WP Engine—the options felt endless, and each claimed to be the best. I wasted hours comparing plans until a friend pointed me to Hostinger. It was a game-changer, and here’s why it worked for me:
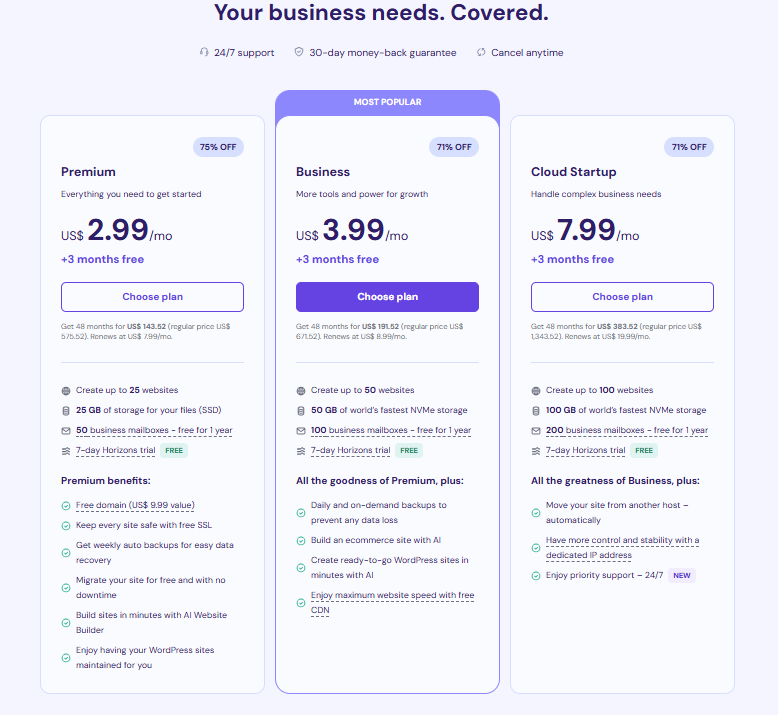
- Affordable pricing: I snagged the Premium Shared Hosting plan for $2.99/month—cheaper than my Netflix subscription.
- Free domain name: No extra cost for
fishingword.com. - User-friendly dashboard: No confusing menus or techy overload.
- Fast and reliable: My site loads in under 2 seconds, which keeps visitors happy.
Hostinger also throws in a 30-day money-back guarantee, so I felt safe trying it out. If you’re new to this, trust me—don’t overthink hosting. Hostinger’s beginner-friendly setup is perfect for getting started without a headache.
How to do it:
- Visit Hostinger’s website .
- Choose the Premium Shared Hosting plan (it supports multiple sites if you expand later).
- Sign up with your email and payment details.
- Select a billing cycle (longer terms save more—I went with 48 months for the best deal).

Pro tip: Avoid super-cheap hosts promising $1/month—they often skimp on speed or support, and you’ll regret it when your site crashes.
Step 2: Picking a Domain Name (Your Site’s Identity)
Naming your website is like naming a pet—it’s exciting but can feel high-stakes. I spent way too long brainstorming names for my fishing blog, from FishWhisperer to ReelAdventures. I settled on fishingword.com because it was short, memorable, and reflected my passion.
Here’s what I learned about choosing a domain:
- Keep it short: Aim for 2-3 words (e.g.,
CraftyCorner,TechBit). - Make it memorable: Avoid hyphens, numbers, or weird spellings (e.g.,
Gr8Site). - Stick to .com: It’s the most trusted extension, but
.coor.cawork for niche audiences (I considered.casince I’m in Canada). - Reflect your brand: Pick something tied to your niche—blog, business, or hobby.
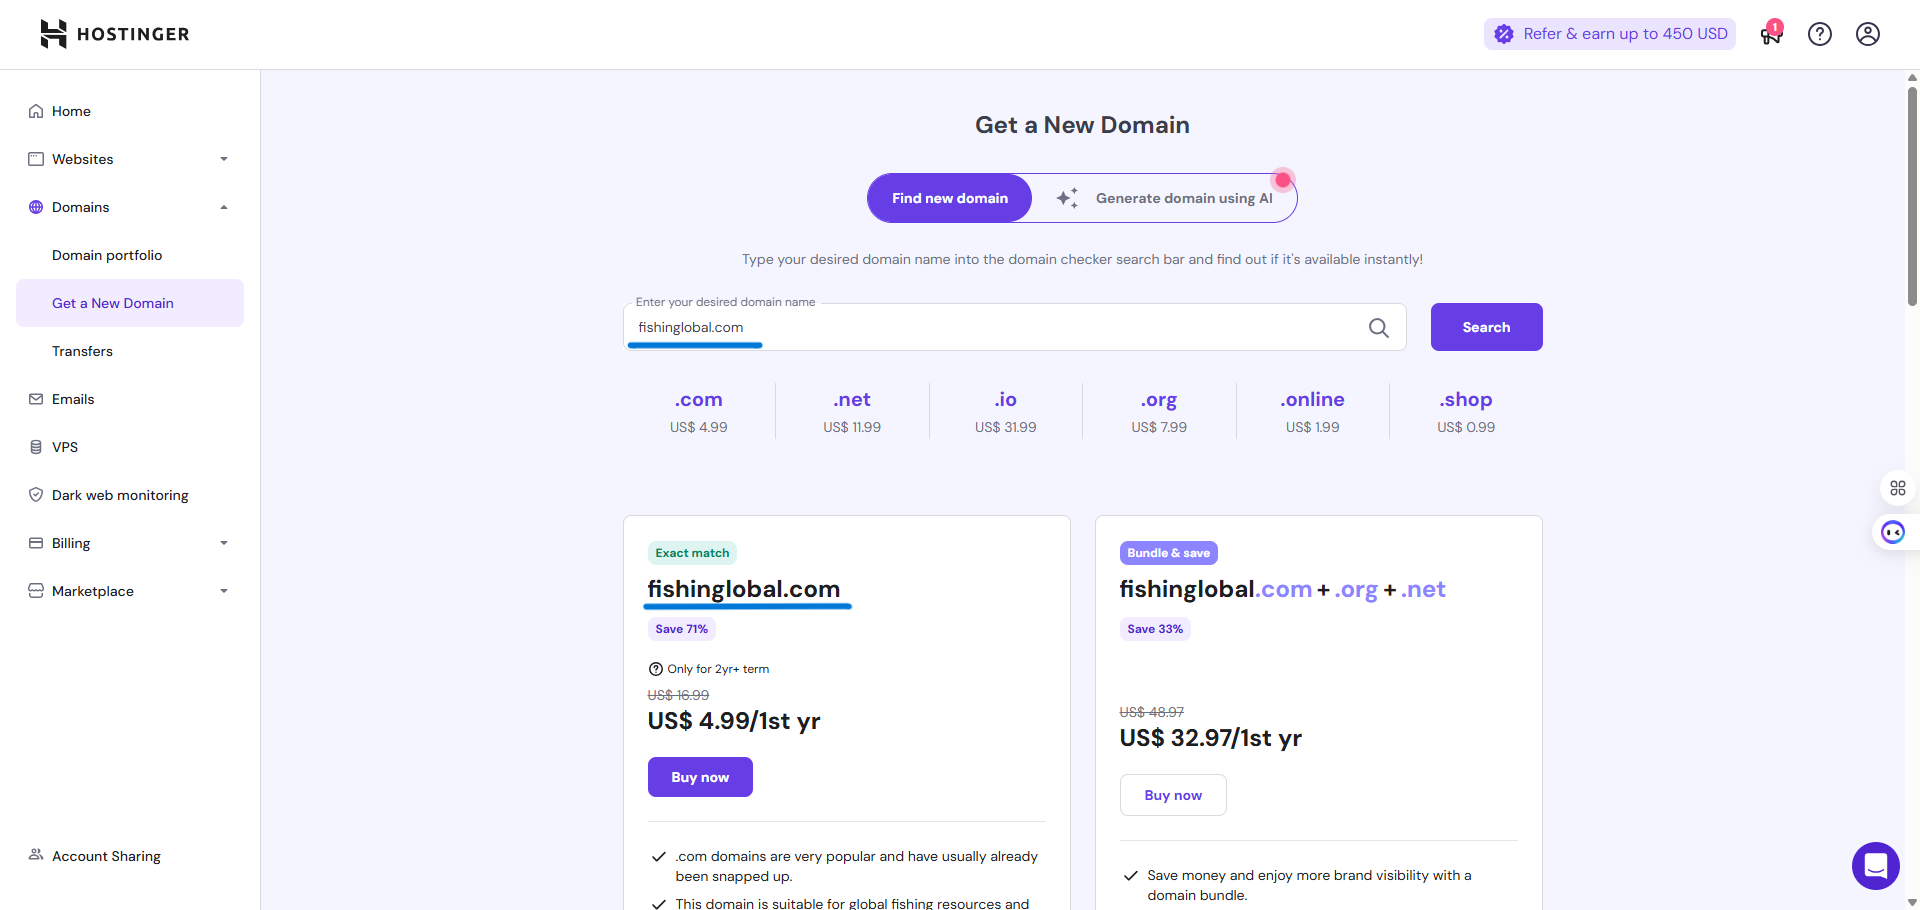
Hostinger includes a free domain with the Premium plan, so you don’t need to buy one separately. During checkout, you’ll search for your domain in Hostinger’s dashboard. If your first choice is taken, try adding words like “my,” “the,” or your location (e.g., TorontoFishTales).
How to do it:
- In Hostinger’s checkout, enter your desired domain in the search bar.
- Check availability—if it’s taken, tweak it or choose a different extension.
- Confirm your selection (it’s free for the first year).

Pro tip: Grab your domain early, even if you’re not ready to build.
Step 3: Installing WordPress (Two Clicks, No Sweat)
Once I paid for Hostinger, I expected a complicated setup process—servers, databases, FTP, oh my! But Hostinger’s hPanel (their control panel) made it stupidly easy. Their Auto Installer set up WordPress—the platform powering 40% of the internet—in two clicks.
Here’s what I did:
- Logged into Hostinger’s hPanel (you get access after signup).
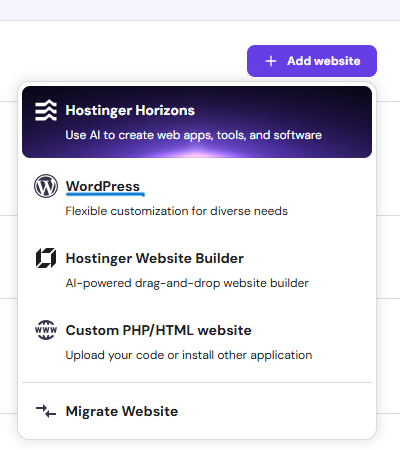
- Clicked Auto Installer and selected WordPress.
- Entered basic info:
- Site name (e.g., “Fish Tales Blog”).
- Admin username and password (write these down!).
- Email for notifications.
- Hit Install, and in under a minute, my site was live at
myfishtales.com.
WordPress is like the backbone of your site—it handles content, design, and functionality without you touching code. I was shocked at how fast this was.
How to do it:
- In Hostinger’s hPanel, find Auto Installer under Websites.
- Select WordPress and fill in your site details.
- Click Install and wait for the confirmation.

Pro tip: Save your WordPress login URL (
yourdomain.com/wp-admin) and credentials in a secure place like LastPass. I forgot mine once and had to reset it—annoying!
Step 4: Making Your Site Look Pro (No Design Skills Needed)
When I first logged into WordPress, my site looked like a blank canvas—functional but boring. WordPress themes are what transform that blank slate into a polished website. Think of themes as pre-designed templates you can customize to match your vibe.
I chose Blocksy, a free, modern theme that’s lightweight and flexible. It’s perfect for blogs, portfolios, or small businesses. Here’s how I made my site pop:
- Logged into WordPress at
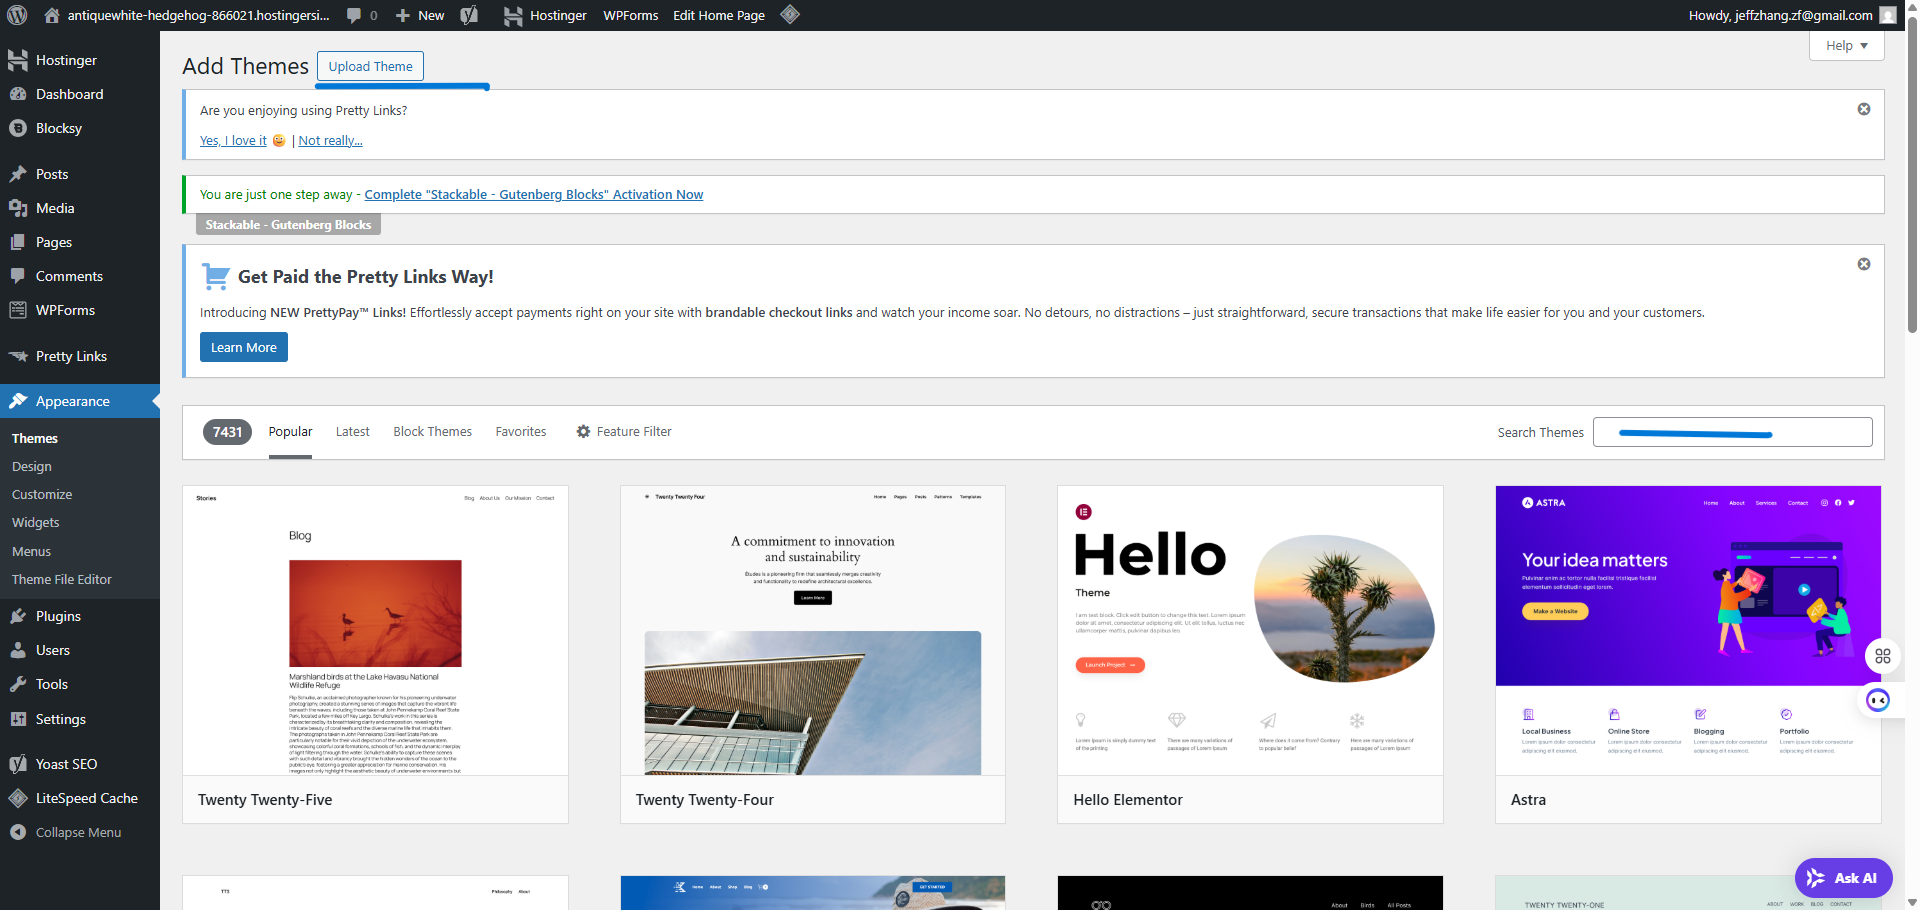
fishingword.com/wp-admin. - Went to Appearance > Themes > Add New.
- Searched for Blocksy, clicked Install, then Activate.
- Opened the Customizer (under Appearance) to tweak:
- Site title: Changed to “Fish Tales Blog.”
- Colors: Picked a blue-green palette to match my fishing theme.
- Logo: Made a simple logo in Canva with a fish icon.
- Fonts: Chose clean, readable fonts like Lora for headers.
In 10 minutes, my site went from generic to mine. I added a header image of a lake at sunset (sourced from Unsplash) to set the mood.
How to do it:
- In WordPress, go to Appearance > Themes > Add New.
- Install and activate Blocksy (or try Astra for another free option).
- Use the Customizer to adjust colors, fonts, and logo.
- Add a header image via Appearance > Customize > Header.

Pro tip: Stick to free themes at first—Blocksy or Astra are plenty powerful. Paid themes can cost $50+, and you don’t need them yet.
Step 5: Supercharging Your Site with Plugins
Plugins are like apps that add features to your website. I was tempted to install a dozen, but too many can slow your site down. I stuck to four essentials, all free:
| Plugin | Why I Love It |
|---|---|
| Rank Math | Optimizes my posts for Google with keyword suggestions and SEO scores. |
| LiteSpeed Cache | Speeds up my site so pages load instantly (works great with Hostinger). |
| WPForms | Creates contact forms so readers can email me about fishing tips. |
| Pretty Links | Shortens and tracks affiliate links (like my Hostinger referral). |
Installing plugins is a breeze: go to Plugins > Add New, search for the plugin, click Install, then Activate. I set up Rank Math’s wizard to optimize SEO, added a WPForms contact form, and used Pretty Links to create a clean affiliate link .
How to do it:
- In WordPress, go to Plugins > Add New.
- Search for each plugin (Rank Math, LiteSpeed Cache, WPForms, Pretty Links).
- Install and activate, then follow setup wizards for Rank Math and WPForms.
Pro tip: Limit yourself to 5-7 plugins to keep your site fast. Check our Best WordPress Plugins for Beginners for more recommendations.
Step 6: Adding Essential Pages and Content
A website needs a few core pages to feel complete. I added three to start:
- Home Page: A welcome message and a blog post teaser (Blocksy made this easy with pre-built layouts).
- About Me: A short bio about my fishing journey, with a photo I took at the lake.
- Contact: A WPForms form so readers could reach out.
I also wrote my first blog post, “Top 5 Fishing Lures for Beginners,” using Rank Math to optimize it for the keyword “fishing lures 2025.” It took 20 minutes, and seeing my words online felt amazing.
How to do it:
- Go to Pages > Add New in WordPress.
- Create Home, About, and Contact pages using the block editor.
- Add a contact form via WPForms (drag-and-drop).
- Write a blog post under Posts > Add New, using Rank Math for SEO.
Pro tip: Start with one blog post to get the hang of it. Use our How to Write Your First Blog Post guide for tips.
Step 7: Final Polish Before Going Live
Before sharing my site, I added a few finishing touches to make it professional:
- SSL Certificate: Hostinger automatically enabled HTTPS, making my site secure (look for the padlock in the browser).
- Favicon: Uploaded a tiny fish icon as my site’s logo in the browser tab (via Appearance > Customize > Site Identity).
- Mobile Check: Previewed my site on my phone to ensure it looked great (Blocksy is mobile-responsive).
- SEO Setup: Used Rank Math to set a focus keyword and meta description for my homepage.
- Social Media: Added links to my Instagram and Twitter in the footer.
It wasn’t perfect, but it was live—and that’s what mattered. I shared fishingword.com with friends, and their “Wow, you made this?” reactions were worth every minute.
How to do it:
- Confirm HTTPS is active in Hostinger’s hPanel (under Security).
- Set a favicon in Appearance > Customize > Site Identity.
- Preview your site on mobile via Customize > Preview > Mobile.
- Configure Rank Math’s SEO settings for your homepage.
Pro tip: Don’t aim for perfection—launch your site and tweak it later. Done is better than perfect!
Troubleshooting Common Beginner Hiccups
I hit a few bumps along the way, so here’s how to avoid them:
- Site not loading? Clear your browser cache or check Hostinger’s status page for server issues.
- Forgot WordPress password? Reset it via
yourdomain.com/wp-adminor Hostinger’s hPanel. - Theme looks weird? Ensure you’re using a reputable theme like Blocksy and clear LiteSpeed Cache after changes.
- SEO not working? Run Rank Math’s setup wizard and submit your sitemap to Google Search Console.
- Plugin conflict? Deactivate plugins one by one to find the culprit (I had an issue with an outdated plugin).
For more fixes, see our WordPress Troubleshooting for Beginners.
Use Cases: What Kind of Site Can You Build?
This process works for any website type. Here’s how to adapt it:
- Blog: Like my fishing blog, use Blocksy for a clean layout and Rank Math for SEO. Write posts about your passion (e.g., travel, cooking).
- Portfolio: Showcase your work (photography, design) with a gallery theme like Astra and a WPForms contact form for inquiries.
- Small Business: Add a WooCommerce plugin to sell products (e.g., handmade jewelry). Use Hostinger’s Business plan for extra resources.
- Nonprofit: Create a donation page with WPForms and share your mission on an About page.
No matter your goal, WordPress and Hostinger have you covered.
Tools to Make It Even Easier
I used a few extras to streamline the process (all beginner-friendly):
- Canva: Free for logos and graphics. I made my fish logo in 10 minutes. Try Canva .
- Unsplash: Free, high-quality images for headers or blog posts.
- Grammarly: Catches typos in my blog posts. Get Grammarly .
- Laptop: Any decent laptop works. I used a Lenovo IdeaPad .
Affiliate Disclosure: We may earn a small commission from qualifying purchases at no extra cost to you.
Final Thoughts: Just Start Your Website
Building my first website felt like a leap, but it was one of the most rewarding things I’ve done. In 30 minutes, I went from an idea to a live site that’s now my creative outlet. Whether you’re sharing stories, selling products, or building a brand, the tools are simpler than ever in 2025.
My biggest advice? Don’t wait for perfect. Grab a domain, sign up with Hostinger, and start clicking. You’ll figure it out as you go, and Hostinger’s 24/7 support has your back if you get stuck. That one click could turn your dream into something real.
Ready to launch your site? Get 75% off Hostinger now and start your 30-minute journey!
Quick FAQ for Beginners
Do I need coding skills to build a website?
Nope! WordPress and Hostinger handle the techy stuff. If you can use a smartphone, you’re good.
What if I mess up my site?
Hostinger’s 24/7 chat support is a lifesaver—I used it twice, and they fixed my issues in minutes. You can also restore backups in hPanel.
Can I change my site later?
Absolutely. Themes, plugins, and content are fully editable. I’ve tweaked my site dozens of times.
Is Hostinger good for blogs, stores, or portfolios?
Yes! WordPress is flexible for any site type. Add WooCommerce for stores or a gallery theme for portfolios.
How much does it cost long-term?
My Hostinger plan is $2.49/month (billed annually), plus $0 for the first year’s domain. Renewals are affordable, and WordPress/plugins are free.
Can I move my site to another host later?
Yes, Hostinger makes migration easy, but I’ve stuck with them for their speed and support.
Ready to Build Your Site?
Don’t let fear hold you back. With Hostinger, you get:
- Free domain for the first year.
- 1-click WordPress setup.
- 30-day money-back guarantee.
👉 Start your website with 75% off Hostinger and see your idea come to life in 30 minutes!
Join our newsletter for weekly WordPress tips, hosting deals, and SEO hacks to make your site shine. Check out these guides to keep learning: